Spring
Spring
Spring简介
Spring是一个轻量级的控制反转(IOC)和面向切面编程(AOP)的框架
Spring组成
- Spring Boot
- 一个快速开发的脚手架。
- 基于SpringBoot可以快速开发单个微服务。
- SpringCloud
- SpringCloud基于SpringBoot实现的。
现在大多数公司都在使用SpringBoot进行快速开发,学习SpringBoot的前提,需要完全掌握Spring及SpringMVC。
IOC
IOC理论
控制反转 IOC 是一种设计思想,个人认为所谓控制反转就是获取依赖对象的方式反转了。
控制:谁来控制对象的创建。传统的应用程序是由程序本身控制创建的,使用Spring后,对象是由Spring来创建的。
反转:程序本身不创建对象,而变成被动的接收对象。
比如通过set接口使得程序不再具有主动性,而是变成了被动的接受对象。控制器不再是在程序猿手上,而是在用户手上,程序猿不用在去管理对象的创建了,系统的耦合性大大降低~private UserDao userDao;
//利用set进行动态实现对象的注入
public void setUserDao(userDao userDao) {
this.userDao = userDao;
}

解耦过程:
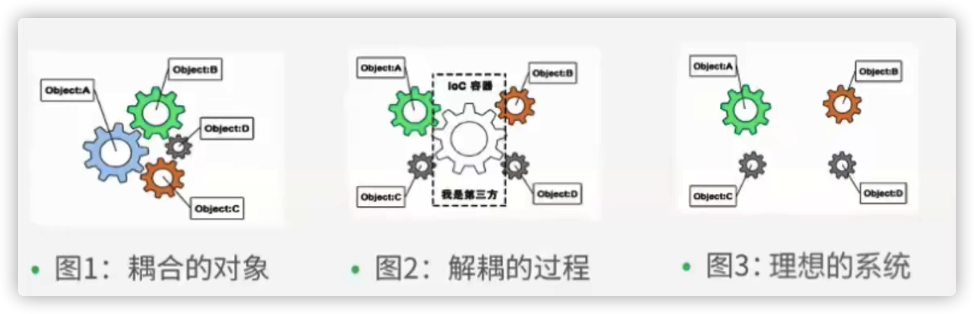
IOC本质
控制反转是一种通过描述(XML或注解)并通过第三方去生产或获取特定对象的方式。在Spring中实现控制反转的是IOC容器,其实现方法是依赖注入(Dependency Injection,DI)。依赖注入:就是利用set方法来实现注入的。<!--使用Spring来创建对象,在Spring中对象成为Bean-->
<!--传统式声明:类型 变量名 = new 类型();
Hello hello = new Hello();
在bean中,id相当于变量名,name是给bean取的别名,class相当于new的对象(类):包名+类。
property相当于给对象(类)中的属性设置一个值,调用的是对象中的set方法。其中value是基本数据类型赋值,ref是对象赋值。
ref:引用在Spring容器中创建好的对象。
-->
<bean id="hello" class="com.lvjie.pojo.Hello" name="hello1">
<property name="str" value="Spring" ref="hello"/>
</bean>
使用Spring容器获取对象://获取Spring的上下文对象
ApplicationContext context = new ClassPathXmlApplicationContext("beans.xml");
//我们的对象都在Spring中管理了,要使用的话直接取出来就可以
Hello hello = (hello) context.getBean("hello");
System.out.println(hello.toString());
IOC创建对象的方式
使用无参构造创建对象,默认!
使用有参构造创建对象(假设构造方法含有一个参数)
下标赋值
下标赋值 <bean id="user" class="com.lvjie.pojo.User">
<constructor-arg index="0" value="lvjie"/>
</bean>类型(不推荐,可能类型重复)
类型 <bean id="user" class="com.lvjie.pojo.User">
<constructor-arg type="java.lan.String" value="lvjie"/>
</bean>参数名
参数名 <bean id="user" class="com.lvjie.pojo.User">
<constructor-arg name="name" value="lvjie"/>
</bean>
Spring配置
导入jar包
<!-- https://mvnrepository.com/artifact/org.springframework/spring-webmvc --> |
别名
alis可以给bean取一对一别名,name可以bean取多个名字
import
import一般用于团队开发使用,可以将多个配置文件导入合并为一个总的,使用的时候直接使用总的配置就可以了。
依赖注入(DI)
构造器注入
Set注入【重点】
依赖注入本质是Set注入,包括有:
bean | ref | list | set | map | props | value
p/c命名空间注入
<!--需要线引入第三方约束--> |
<!--p命名空间注入可以直接注入属性的值--> |
bean的作用域
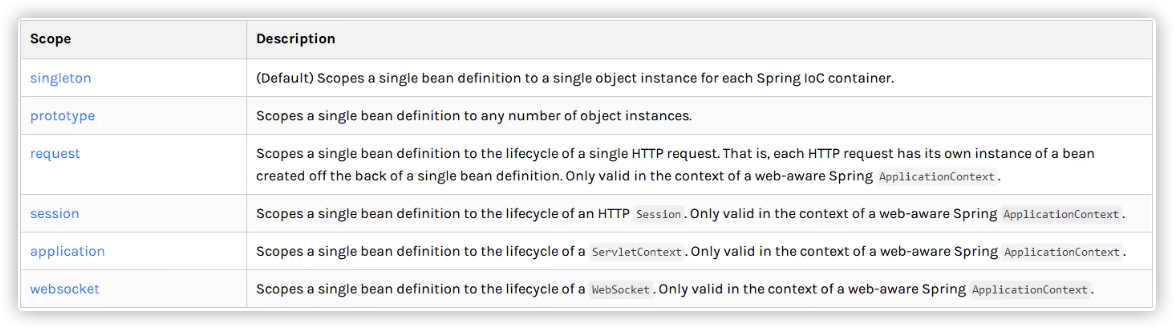
单例模式(Spring默认模式):每次从容器中get的对象是同一个。
单例模式 <bean id="user" class="com.lvjie.pojo.User" scope="singleton"/>
原型模式:每次从容器中get的时候,都会产生一个新对象。
原型模式 <bean id="user" class="com.lvjie.pojo.User" scope="prototype"/>
其余的request、session、application、这些只能在 web开发中使用到。
Bean的自动装配
自动装配是Spring满足bean依赖的一种方式,Spring会在上下文中自动寻找,并给bean装配属性。在Spring中有三种装配的方式:
- 在xml中显示的配置
- 在Java中显示的配置
- 隐式的自动装配bean【重要】
byName/byType自动装配
<!--byName: 会自动在容器上下文中查找,和自己对象set方法里面的值对应的beanid!--> |
<!--byType: 会自动在容器上下文中查找,和自己对象属性类型相同的bean!--> |
小结:byName的时候,需要保证所有的bean的id唯一,并且这个bean需要和自动注入的属性的set方法里面的值一致。byType的时候,需要保证所有的bean的class唯一,并且这个bean需要和自动注入的属性的类型一致。
使用注解自动装配
要使用注解需要:导入约束(context)、配置注解的支持(context:annotati on-config)、在对象属性前或set方法前加入@Autowired。
<beans xmlns="http://www.springframework.org/schema/beans"
xmlns:xsi="http://www.w3.org/2001/XMLSchema-instance"
xmlns:context="http://www.springframework.org/schema/context"
xsi:schemaLocation="http://www.springframework.org/schema/beans
https://www.springframework.org/schema/beans/spring-beans.xsd
http://www.springframework.org/schema/context
https://www.springframework.org/schema/context/springcontext.xsd"
<context:annotation-config>
</beans>public class People {
private Cat cat;
//@Autowired
//public Cat setCate(){
// return cat;
//}
}
注解是用反射来实现的。使用Autowired我们可以不用编写Set方法了。
- @Autowired默认通过byType方式实现,而且必须要求这个对象存在。【常用】
- 如果Autowired不唯一自动装配属性(当有多个对象时),则需要通过@Qualifier(value=“xxx”)
- @Resource默认通过byName方式实现,如果找不到名字,则通过byType实现。如果两个都找不到的情况下就报错。
- @Autowired(required = false) 字段标记了注解说明这个对象可以为null。@Nullable 字段标记这个字段可以为null。
使用注解开发
bean
要使用注解开发,必须要保证aop的包导入了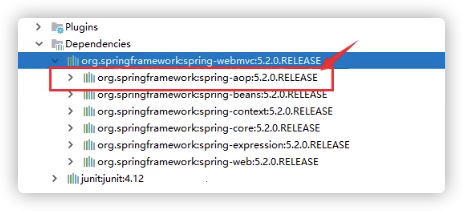
使用注解需要导入context约束,增加注解的支持。
<beans xmlns="http://www.springframework.org/schema/beans"f
xmlns:xsi="http://www.w3.org/2001/XMLSchema-instance"
xmlns:context="http://www.springframework.org/schema/context"
xsi:schemaLocation="http://www.springframework.org/schema/beans
https://www.springframework.org/schema/beans/spring-beans.xsd
http://www.springframework.org/schema/context
https://www.springframework.org/schema/context/spring-context.xsd">
<!--指定要扫描的包,这个包下的注解就会生效-->
<context:component-scan base-package="com.lvjie.pojo"/>
<context:annotation-config/>
</beans>
@Component注解等价于<bean id="user" class="com.lvjie.pojo.Uer"/>
属性注入
@Value("lvjie")注解相当于<property name="name" value="lvjie"/>
public class User {
public String name;
public void setName(String name) {
this.name = name;
}
}
衍生注解
@Component 有几个衍生注解:但功能都相当于@Component,都代表将某个类注册到Spring中,对应分层对应注解名称使用。
- dao层注解【@Repository】
- service层注解【@Service】
- controller层注解 【@Controller】
作用域
@Scope("xxx")注解使用在类前相当于bean的作用域。
小结
xml 适用于任何场合,维护简单方便。注解 不是自己的类不能使用。
xml 与注解 最佳实践:
- xml用来管理bean
- 注解只负责完成属性的注入
使用Java的方式配置Spring
//这里这个注解的意思,就是说明这个类被Spring接管了,注册到了容器中 |
package com.lvjie.config; |
public class MyTest { |
这种纯Java的配置方式,在SpringBoot中随处可见!
代理模式
静态代理
代理模式的好处:
- 可以使真实角色的操作更加纯粹,不用取关注一些公共的业务
- 公共业务就交给代理角色,实现了业务的分工
- 公共业务发生扩展时,方便集中管理
缺点:
- 一个真实角色就会产生一个代理角色,代码量会翻倍,开发效率会变低~
动态代理可以解决以上缺点。
动态代理
- 动态代理和静态代理角色一样
- 动态代理的代理类是动态生成的,不是我们直接写好的
- 动态代理分为两大类:基于接口的动态代理和基于类的动态代理
- 基于接口 ——— JDK动态代理
- 基于类 ——— cglib
- Java字节码实现 ——— javasist
需要了解两个类:Proxy:代理;InvocationHandler:调用处理程序。//等我们会用这个类,自动生成代理类!
public class ProxyInvocationHandler implements InvocationHandler {
//被代理的接口
private Object target;
public void setTarget(Object target) {
this. target = target;
}
//生成得到代理类
public Object getProxy(){
return Proxy.newProxyInstance(this.getClass().getClassLoader(), target.getClass().getInterfaces(), this);
}
//处理代理实例,并返回结果:
public Object invoke(Object proxy, Method method, Object[] args) throws Throwable {
log(method.getName());
object result = method.invoke(target, args);
return result;
}
public void log(String msg){
System.out.print1n("执行了"+msg+"方法");
}
}public class Client {
public static void main(String[] args) {
//真实角色
UserServiceImpl userService = new UserServiceImpl();
//代理角色,不存在
ProxyInvocationHandler pih = new ProxyInvocationHandler();
pih.setTarget(userService); // 设置要代理的对象
//动态生成代理类
UserService proxy = (UserService) pih.getProxy();
proxy.query();
}
}
动态代理的好处:
- 可以使真实角色的操作更加纯粹,不用取关注一些公共的业务
- 公共业务就交给代理角色,实现了业务的分工
- 公共业务发生扩展时,方便集中管理
- 一个动态代理类代理的是一个接口,一般就是对应的一类业务
- 一个动态代理类可以代理多个类,只要是实现了同一个接口即可
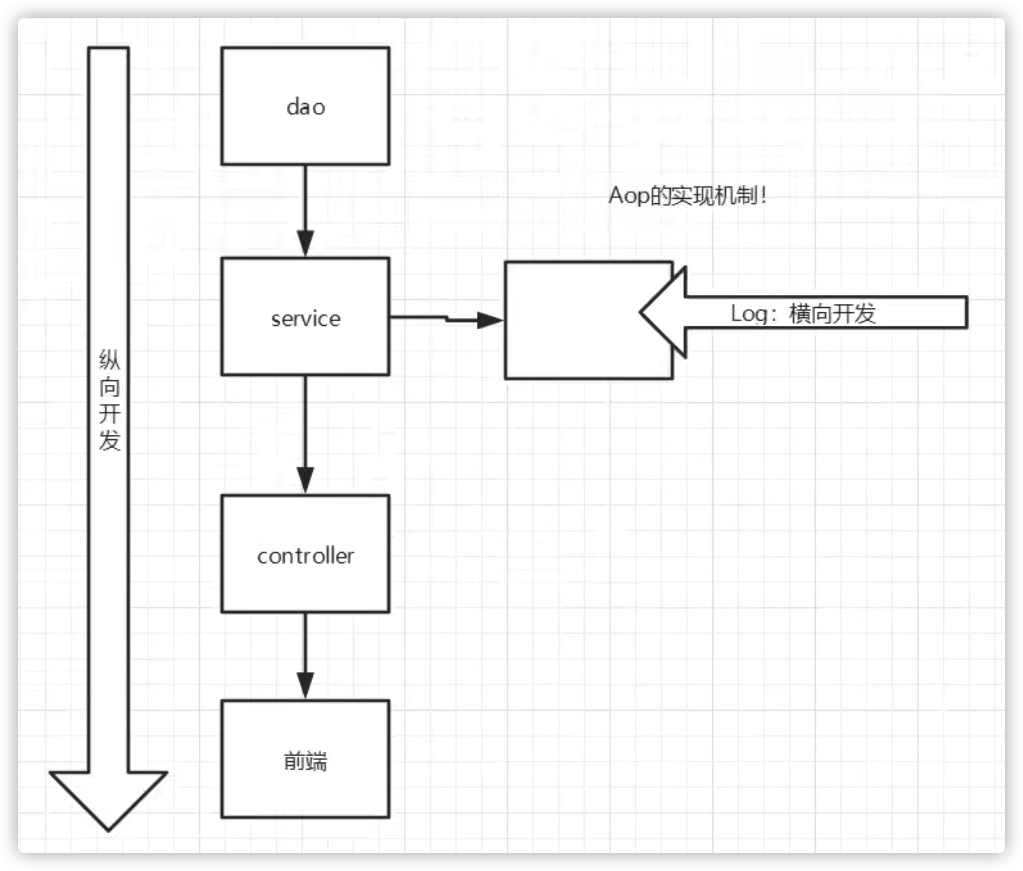
AOP
AOP简介
AOP(Aspect Oriented Programming):面向切面编程。底层是动态代理。利用AOP可以对业务逻辑的各个部分进行隔离,从而使得业务逻辑各部分之间的耦合度降低,提高程序的可重用性,同时提高了开发的效率。
AOP在Spring中的作用
==提供声明式事务:允许用户自定义切面==
使用Spring实现AOP
使用Spring API接口
使用AOP,需要导入一个依赖包<!-- https://mvnrepository.com/artifact/org.aspectj/aspectjweaver -->
<dependency>
<groupId>org.aspectj </groupId>
<artifactId>aspectjweaver</artifactId>
<version>1.9.4</version>
</ dependency>public class Log implements MethodBeforeAdvice {
//method: 要执行的目标对象的方法
//args: 参数
//target: 目标对象
public void before(Method method, Object[] args, Object target) throws Throwable {
System.out.println(target.getClass().getName()+"的"+method.getName()+"被执行了");
}
}public class AfterLog implements AfterReturningAdvice {
//returnValue: 返回值
public void afterReturning(Object returnValue, Method method, Object[] args, object target) throws Throwable {
System.out.printin("执行了" + method.getName() + "方法,返回结果为:" + returnValue);
}
}
<beans xmlns= "http://www.springframework.org/schema/beans"
xmlns:xsi="http://www.w3.org/2001/XMLSchema-instance"
xmlns:aop="http://www.springframework.org/schema/aop"
xsi:schemaLocation="http://www.springframework.org/schema/beans
https://www.springframework.org/schema/beans/spring-beans.xsd
http://www.springframework.org/schema/aop
https://www.springframework.org/schema/aop/spring-aop.xsd">
<!--注册bean-->
<bean id-"userService" class=" com.lvjie.service.UserServiceImpl"/>
<bean id="log" class="com.lvjie.log.Log"/>
<bean id="afterLog" class-"com.lvjie.log.AfterLog"/>
<!--方式一:使用原生Spring API接口--ン
<!--配置aop:需要导入aop的约束--〉
<aop:config>
<!--切入点: expression: 表达式,execution( 要执行的位置! *****)-->
<aop:pointcut id="pointcut" expression="execution(* com.lvjie.service.UserServiceImpl.*(..))"/>
<!--执行环绕増加! -->
<aop:advisor advice-ref"log" pointcut-ref="pointcut"/>
<aop:advisor advice-ref="afterLog" pointcut-ref="pointcut"/>
</aop:config>
</beans>public class MyTest {
public static void main(String[] args) {
ApplicationContext context = new ClassPathXmlApplicationContext("applicationContext.xml");
//动态代理代理的是接口:注意点
UserService userService = (UserService)context.getBean("userService");
userService.select();
}
}
自定义类
<!--方式二:自定义类--> |
使用注解实现
<!--方式三--> |
//标注这个类是一 个切面 |
整合Mybatis
Mybatis-spring
编写数据源
sqlSessionFactory
sqlSessionTemplate
需要给接口加实现类
将自己写的实现类注入到Spring中
测试
MyTest public class MyTest {
public void test() throws IOException {
ApplicationContext context = new ClassPathXmlApplicationContext("applicationContext.xml");
UserMapper userMapper = context.getBean("userMapper", UserMapper .class);
for(User user : userMapper.selectUser()) {
System.out.println(user);
}spring-dao.xml <!--DataSource: 使用Spring的数据源替换Mybatis的配置
我们这里使用Spring提供的JDBC:org.springframework.jdbc.datasource
-->
<bean id="dataSource" class="org.springframework.jdbc.datasource.DriverManagerDataSource">
<property name="driverClassName" value="com.mysql.jdbc.Driver"/>
<property name="url" value="jdbc:mysql://localhost:3306/mybatis?useSSL=true&useUnicode=true&characterEncoding=UTF-8"/>
<property name="username" value="root"/>
<property name="password" value="123456"/>
</bean>
<!--sqLSessionFactory-->
<bean id="sqlSessionFactory" class="org.mybatis.spring.SqlSessionFactoryBean">
<property name="dataSource" ref="dataSource" />
<!--绑定Mabatis配置文件-->
<property name="configuration" value="classpath:mybatis-config.xml"/>
<property name="mapperLocations" value="classpath:com/lvjie/mapper/*.xml"/>
</bean>
<!--SqLSessionTemplate: 就是我们使用的sqlSession-->
<bean id="sqlSession" class="org.mybatis.spring.SqlSessionTemplate">
<!-- 只能使用构造器注入SessionFactory, 因为它没有set方法-->
<constructor-arg index="0" ref=" sqlSessionFactory"/>
</bean>
<bean id="userMapper" class="com.lvjie.mapper.UserMapperImpl">
<property name="sqlSession" ref="sqlSession"/>
</bean>UserMapperImpl public class UserMapperImpl implements UserMapper {
//在原来我们的所有操作,都使用sqlSession来执行,现在都使sqlSessionTemplate;
private SqlSessionTemplate sqlSession;
public void setSqlSession(SqlSessionTemplate sqlSession) {
this.sqlSession = sqlSession;
}
public List<User> selectUser() {
UserMapper mapper = sqlSession.getMapper(UserMapper.class);
return mapper.selectUser();
}
}
声明式事务
事务
- 把一组业务当成一个业务来做;要么都成功,要么都失败!
- 确保完整性和一致性;
事务ACID原则:
- 原子性
- 一致性
- 隔离性
- 多个业务可能操作同一个资源,防止数据损坏
- 持久性
- 事务一旦提交,无论系统发生什么问题,结果都不会再被影响,被持久化的写到存储器中!
Spring中的事务管理
<!--配置声明式事务--> |
Spring
1.absolute和relative定位
2.display:table-cell在布局上的应用
3.两列布局css
4.解决GitHub访问不了问题
5.Collection集合和Map集合
6.JDK,JRE和JVM